Different Receiving Options
We can use different methods for receiving goods in our subinventories
1.) Allow Substitute Receipts: It is used in case our supplier sends us a substitute item. It means we have ordered for item A but we have received item B.
Define relationship between items. Navigate to Items > Item Relationships à Click on New & give details as shown below

It means that we can receive VS ASL Item1 instead of VS ASL Item 2
Now navigate to Setup > Organizations > Receiving Options & check the Allow Substitute Receipt checkbox & save the record

This option can be over written at PO level
Next is to create a PO. While creating a PO, we can overwrite the ‘Allow Substitute Receipts’ option

Save & approve the PO

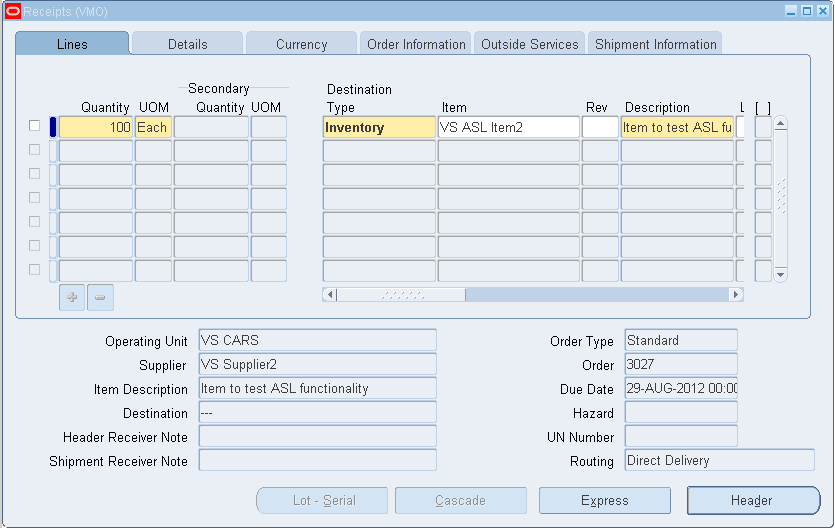
Now navigate to Receiving > Receipts

Here we can see that item field is enabled & if we wish, we can change the item details

Save the record.
2.) Allow Unordered Receipts: When we go for Allowed Unordered Receipts then goods will be sent to us without a PO. But these goods can only be sent till receiving. If we wish to transact these goods to sub inventory then a PO is required.
Navigate to Setup > Organizations > Receiving Options

Check the ‘Allow Unordered Receipts’ checkbox & save the record
Now navigate to Receiving > Receipts à Click on Unordered & give details as shown below (Here we need to give each & every detail manually)


A Receipt number will be generated at Header level.
Now check the Receiving Transaction Summary. Navigate to Receiving > Receiving Transaction Summary à Search by receipt number

Here Transaction Type is Unordered Receipt
Next step is to create a PO. The Receipt Routing for this PO can be either Standard or Inspection (Because a Direct PO will send the goods directly to sub inventories)

Save & approve the PO

Now Navigate to Receiving > Match Unordered Receipts & give details as shown below

Now again Navigate to Receiving Transaction Summary form

Here we can see that the receipts are matched with PO.
Till now goods are in Receiving area. We need to move these goods to Sub Inventory. Navigate to Receiving > Receiving Transactions
Give Sub Inventory details & save the record

Again Navigate to Receiving Transaction Summary form

We can see that the goods are now moved to subinventory
3.) Express Transaction: It is used when the receipt routing method is Inspection but due to some business requirement, we do not want our goods to be inspected. Means they should be directly sent to subinventories
Navigate to Setup > Organization > Receiving Options

Check the ‘Allow Express Transactions’ checkbox & save the record
Now create a PO with Receipt Routing as Inspection Required & give subinventory details in Distribution Tab


Save & Approve the PO

Now Navigate to Receiving > Receipts à Here we can see that Express option is enabled. If we make any changes in the receipt. This option will be disabled so without making any changes click on Express

& save the record

4.) Cascade Transactions: In such transactions the quantity which is not fulfilled in first shipment will be fulfilled in subsequent shipments.
Navigate to Setup > Organizations > Receiving Options à Check Allow Cascade Transaction Check Box

Next is to create a PO. Navigate to Purchase Orders > Purchase Orders & give details as shown below


Save & approve the PO

Navigate to Receiving > Receipts à Give PO & Line Number in search criteria

We can see that Cascade Tab is enabled. Click on Cascade & give details as shown below


Give sub inventory details & save the record. Requery & you can see the price has been adjusted

5.) Blind Receiving: This option is used when we want our receipts to show 0 quantity no matter whatever is the quantity mentioned in PO. The purpose behind it is to count the goods once they arrive in your inventory & enter the quantity manually
Create a PO

Check receipt for this PO
Right now we are able to see the quantity in receipts. Now navigate to Setup > Organizations > Receiving Options àCheck Allow Blind Receiving checkbox

Now again check the receipt

Now we can see that the quantity is 0. Quantities will be counted & then entered into the receipts
Regards
ReplyDeleteSridevi Koduru (Senior Oracle Apps Trainer Oracleappstechnical.com)
LinkedIn profile - https://in.linkedin.com/in/sridevi-koduru-9b876a8b
Please Contact for One to One Online Training on Oracle Apps Technical, Financials, SCM, OAF, ADF, SQL, PL/SQL, D2K at sridevikoduru@oracleappstechnical.com | +91 - 9581017828.